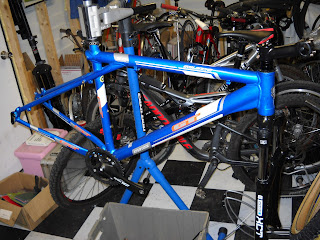
2007 GT Avalanche
I found this GT Avalanche on Craigslist last year. It sat in my shop until I could find the
rest of the parts that went to the bike. When I bought this GT it was missing the front fork, front wheel and seat. The rest of the parts were there and still in good condition. I like finding bikes that are incomplete . It's a challenge to find the right missing parts and my passion is building bikes,
GT Bicycles (a short history)
GT Bicycles was founded in 1979 by BMX racetrack operator Richard Long and engineer and drag car racer Gary Turner. Gary was building custom bicycle frames in his garage in Santa Ana ,California. The finished frames were raced by his son in area BMX races. The GT company was named after Turner's initials and they mostly made BMX bikes and parts for kids. Their first bike frames were made of chrome-moly steel sporting the signature triple triangle design . GT produced BMX bike models "Dyno", Dynamo" , "Powerlite and "Robinson". By 1981 GT was selling complete BMX bicycles and by 1984 they started producing mountain bikes sporting the triple triangle design. The signature triple triangle is a frame design utilizing three triangles. A rear triangle, a front triangle and a triangle connecting the seat tube to the top tube of the frame. GT built mountain bike models with names like "Zaskar" ,"Avalanche" and "Pantera" with the "Zaskar" being their top model.
GT Avalanche how it looked when I found it.
I disassembled the bike and started cleaning the components. Some of the components were very rough to start with. But cleaned up nicely.
Front derailleur (before cleaning)
Rear derailleur (before cleaning)
Crank (before)
Rear disc brake caliper (before)
The first component I started with is the SR Suntour crank. it is a solid aluminum crank with 42x32x 22 tooth sprockets . The paint was pealing and the sprocket teeth were very warn. I tried to take it apart but it did not have removable bolts so I replaced it with a better SR Suntour XCT 42x32x22 tooth crank to match the SR Suntour fork.
Old SR Suntour crank.
New SR Suntour XCT crank
I cleaned the frame with orange cleaner and degreaser and touched up some of the scratches. After that I installed the new crank. The bottom bracket on this bike looked and felt brand new so I did not replace it, The new crank spins nice and fast.
New SR Suntour crank (installed)
Next I started on the derailleurs. This GT has Shimano Acera front and rear derailleurs. The Acera groupset is an entry level group of mountain bike components. These derailleurs work quite well for entry level. The only problem I had with them is they don't shift quick like more expensive derailleurs but they work well for this bke. I cleaned them and oiled all the pivot points now they shift smooth .
Front derailleur (before)
Front derailleur (after)
I disassembled the rear derailleur and cleaned and lubed all the parts. The rear derailleur was pretty rough to start but it cleaned up nicely.
Rear derailleur (before)
Rear derailleur (before) exploded view .
I cleaned the front and rear derailleurs with orange cleaner and polished them with chrome cleaner. next I lubed the pivot points with Triflow lubricant.
Rear derailleur (cleaned and polished) exploded view.
Rear derailleur (cleaned and lubed)
Next component to be worked on is the stem. Some of the paint was scratched off of the top of the stem. Instead of touching it up I just decided to paint it. I used a satin black paint and it turned out pretty good.
Stem and hardware (before)
Stem and hardware (after)
Complete stem
I decided to work on the front end of this bike first because it needed the most parts and it needed the most work. The steerer tube for the fork needed to be cut down and the headset and bearings needed to be cleaned and greased.
Headset bearings (before)
Headset bearings (after cleaning)
Cleaning the headtube was next.
Headtube and bearing races (before)
Headtube and bearing races (after cleaning)
Headtube with greased bearings.
This Avalanche did not have a fork when I found it. I checked Bikepedia.com and found that the SR Suntour XCT suspension fork came standard on the 2007 GT Avalanche. This fork is spring loaded with no rebound adjust, only preload adjustments.This fork is good for light cross country trail riding .
Before greasing the bearings for the headset ,I need to calculate the stack height. The stack height is the total measurement in inches between the top of the head tube and the top of the stem with all spacers stacked in between minus 1/8" for compression when I tighten the headset and stem. I need this measurement so I can cut the steerer tube for the fork .
I made my measurement and cut the steerer tube with a pipe cutter to get a smooth cut . You can also use a hacksaw and a guide but I like this method better.
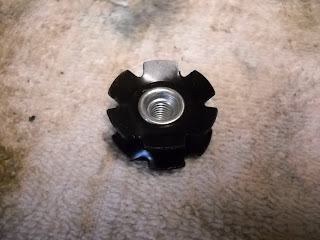
I cut the steerer tube and filed any rough spots. Next I installed the star fangled nut . This nut is forced down inside the steerer tube. It helps keep the headset and stem together.
Star fangled nut.
Star nut installation tool .
Stem installed.
I installed the fork and stem to complete the front end of the bike.
Next I found a front wheel to almost match the rear wheel. I found an Alex DP17 Disc wheel which is a close match to the rear wheel
I cleaned the rotors on both wheels and cleaned and adjusted the brake calipers.
Rear brake rotor. I wet sanded the rotors to remove the light rust.
Front brake rotor.
rear brake caliper (before cleaning)
Rear brake caliper installed.
Front brake caliper installed.
GT used Tektro brakes on this bike . I think they work well for cable pull brakes. Only problem I ran into with the brake calipers was the adjustment barrel would not turn. So I adjusted the brakes using the cable and adjustment barrel on the brake handle.
Next is the rear wheel. This wheel needed a light truing and the bearings needed to be regreased.
Rear hub
Rear hub with cassette and rotor removed.
Inside of rear hub (before cleaning)
Rear axle with hub bearings and hardware.
After cleaning everything up I regreased the bearings and reassembled the hub.
Hub with greased bearings.
Rear hub complete.
The cassette was warn out so I replaced it with a new one ,I also replaced the chain.
Old cassette.
New cassette.
New KMC chain.
After I was done with the wheels, I wrapped them in Hutchinson Scorpion 2.1 tires. These tires have really good grip in the sand or hard packed trail riding.
I installed the rear wheel on the bike so I could line up the rear brake and rear derailleur.
Rear derailleur installed.
The next project for this bike is the shifter brake combo. I took the shifters apart and lubed the shift mechanism. I tried to clean the shift indicator windows but the plastic was yellowed from the sun and weather. The sifters shift smooth. The shifter cables and brake cables both looked new so I did not replace them.
Right shifter/brake combo.
Right shifter/brake combo taken apart and lubed.
Left shifter/brake combo cleaned and lubed.
After servicing the brake and shifters I cleaned up the handle bar and installed the left and right shifter/brake levers.
Once I installed the front derailleur I installed the chain and adjusted both derailleurs.
Front derailleur and chain.
Drivetrain adjusted.
I cleaned the pedals and painted them with satin black paint.
Pedals (before)
pedals painted satin black.
I found a nice MTB saddle to finish off this build. Most saddles get are the first item to be replaced but I think this saddle will last a while.
New MTB saddle.
The rest of the pictures are of the complete bike.
I really enjoyed rebuilding this bike. I took it around my neighborhood and rode a small XC trail by my house. This bike performed well. I like how the front fork takes up all the bumps. it makes for a smooth ride. The Hutchinson Scorpion tires really grip the trail well. This GT Avalanche 3.0 was a pleasure to work on and ride.
That,s all for now ! Cheers !! See you on the trail Tony.


