I found some frames on ebay but while bidding on the frames, the prices ended up going way to high. So I tried Craigslist and found a complete bike for a great price. It was a beach cruiser type bike with a coaster brake, some rust and lots of spray paint hiding the decals and covering the tires and handlebars.
Most parts on the bike were not usable. The wheels were rusted and painted with silver spray paint. One wheel was wider than the other. The handle bars were spray painted gray and the seat was just unacceptable. Items on my parts list include : New wheels, seat and handlebars.
The bike was easy to take apart. I sprayed all nuts and bolts with PB Blaster before taking the bike apart. I cleaned and polished the cranks and stem. The bike also received new tires and a new chain.
Handle bar and stem came off nicely. also seat seat post and cranks came off.
The forks and wheels came off next
I started stripping the white spray paint and pink paint was under that coat.
Forks ,stripped of white spray paint.
I used a strong paint stripper to get the frame down to bare metal, after that I sand blasted the hard to reach places and all the welds.
Forks stripped to bare metal.
I stripped the chain guard .The pieces I did not want painted, I wrapped with painters tape.
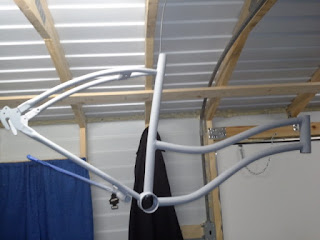
I used automotive primer on all parts to be painted. I then wet sanded the primer to get rid of any lumps.
Frame and forks primed and ready for paint.
Headset parts and seat post clamp primed and ready for paint.
While I was waiting for the primer to dry, I cleaned and polished the cranks and stem. The bolts for the stem are getting painted with a chrome spray paint.
Beth picked Burnt Orange for the color coat. I use Dupli - Color paint because it is already thinned down to work in my spray gun. It also comes in just about any color imaginable. The bike received three coats of color and three to four coats of clear lacquer.
Three to four coats of clear lacquer.
All the bicycle parts getting first color coat.
After the final color coat, I let the frame and other parts dry for 24 hours before applying the clear coat.
Frame clear coated and ready for assembly.
I greased the bottom bracket bearings and installed the cranks. Next I Installed the headset cups, greased the bearings and installed the forks. When installing and tightening the hardware for both the cranks and the headset , make sure they don't feel grainy when you turn the cranks or the forks. If they feel grainy, loosen about half of a turn and tighten a little bit to reduce the play in the bearings.
The bike also received some nice shiny chrome handle bars.
In addition to the handle bars, I also installed : Chrome fenders, Black leather seat and grips with white stitching, new pedals and white wall tires. I did not include separate pictures of these items because I restored this bike a couple of years before I started this blog and I did not see the need to take pictures of the items as part of the build. The next set of pictures are of the bicycle completed and ready to ride.
In the shop.
Nice head badge to accent the bike.
This bike was a pleasure to build. It did not originally come with fenders but these fenders fit nicely. I test rode the bike and it handled nicely. It was fun to ride a cool cruiser like this one. I recently talked to Troy and he said that Hannah loves riding the bike and always gets compliments while riding on the paved trails in town. I hope you enjoyed reading my complete restoration of this bicycle. Check back soon for more restorations. Tony.


No comments:
Post a Comment