1987 Lotus Excelle
I bought this 1987 Lotus Excelle from a swap meet in Dunedin , Florida. It was in good shape and I liked the vibrant blue color. The frame had no rust but it had some bike shop decals on the top tube and the down tube . Like most of my bikes , this one did not come with a saddle or bar tape. The wheels did not match , but for the most part all the components were there.
How it looked when I bought it.
I looked up the Lotus brand on the internet and could not find much information. What I did manage to find was that Lotus was a bicycle brand that was marketed and distributed by Lotus International Corp. of Syosset, New York. Lotus was founded by Sid and Ernst Star. The bicycles were manufactured by Tsunoda Bicycle Corporation of Nagoya, Japan . The high end models were manufactured in Italy, in conjunction with Cinelli. All this information I researched from Wikipedia .
More pictures of the bike before.
I removed all the components from the bike so I could inspect the frame and forks for any damage that I might have missed when I bought the bike. The frame and forks are rust free but the paint has some chips and scuffs that I will address later in the restoration.
The Lotus frame is made from Ishatawa triple butted tubing with forged drop outs. The frame size is 53cm from bottom bracket to top tube.
The paint color is Electric Blue. The paint is dull in some spots and I need to remove those decals from the top tube and down tube. After that I will compound the frame and forks and apply a coat of Carnuba wax.
Head tube (before)
Top tube (before)
Down tube (before)
Seat stay (before)
Chain stay (before)
Rear drop outs (before)
Bottom Bracket (before)
Seat tube (before)
Fork (before)
The fork is made from Tange Manganese Alloy (Mangaloy) 2001 Tubing.
I removed the decals from the top tube and down tube and discovered that the decals were hiding some paint damage. It looks as if pipe clamps were wrapped around the frame. It also looks like someone tried to paint over the damage.
The paint was lumpy on the top tube and down tube. I wet sanded the frame starting with 400 grit sand paper and finishing with 2000 grit sand paper. Then I compounded those sections . After that I matched the paint the best I could and repainted the bad sections.
Head Tube (cleaned and polished)
Fork (cleaned and polished)
Somehow I forgot to take pictures of the restored frame. So I will tell you what I did. First I cleaned and compounded the frame and fork. Then I used a paint polish. After that I waxed the frame with carnuba wax. Then I buffed the frame and forks to a brilliant shine. The paint turned out amazing. Oh and I touched up as many paint chips as I could find.
Headset
I removed the reflector and bracket from the headset. The reflector blocked the view of the Lotus flower headbadge. I removed the white protective caps.
I took this picture so I know how the headset goes back together. This Tange headset has more pieces than I have seen before.
Headset (before cleaning)
Headset cups
Headset cups (before)
Complete headset (so many parts)
Headset cups (cleaned and polished)
The headset cups had no rust on them. I cleaned and polished them with Turtle Wax chrome cleaner and buffed them to a beautiful shine.
Bearings and parts (cleaned and polished)
I pressed the bearing cups into the headset
Headset bearings greased with marine grease.
Next I installed the headset and fork.
Headset (complete)
Tange fork (installed)
Cranks and Bottom Bracket.
The cranks are Shimano FC-B126 with 170mm crank arms. In 1987 Lotus outfitted this bike with Shimano Bio Pace technology. The chain rings are oval instead of round . This is intended to give power all the way through your pedal stroke and avoid the "dead zone" when the crank arms are vertical and the rider has little mechanical advantage.
Bottom bracket (before)
Cranks (before)
I cleaned and polished the cranks using a range of polishing grits on a polishing wheel. Then I finished up using Mothers Aluminum polish.
The Shimano logo on the cranks was rubbed off during the polishing process.
I made some new Shimano decals . I printed them on an inkjet printer using decal paper. Then I clear coated them to protect from water damage.
Next I worked on the bottom bracket. I polished the chrome bearing cups with Turtle Wax chrome cleaner. Then I installed new bearings and a fresh coat of grease.
Bottom bracket (before)
Bottom bracket (cleaned and polished)
I use marine grease because it resists water better than regular bicycle grease.
I adjusted the bottom bracket so it turns smooth with no slack in the bearings.
I installed the cranks and torqued them to 25 ft lbs.
Derailleurs
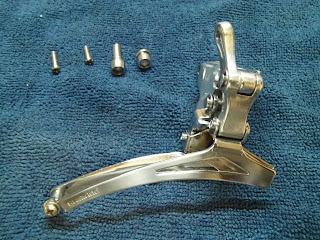
Front derailleur (before)
I removed the front and rear derailleurs. I cleaned them and used Diamond metal polish to bring them to a nice shine.
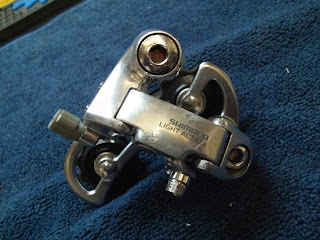
Rear derailleur (before)
The front derailleur is a Shimano FD-Z206. Shimano Z series front derailleurs were used by a variety of bike companies for road and mountain bikes in the 80's
I disassembled the front derailleur and cleaned all the parts.
Front derailleur (cleaned and polished)
After polishing , I added a light coat of oil to all the pivot points on the derailleur.
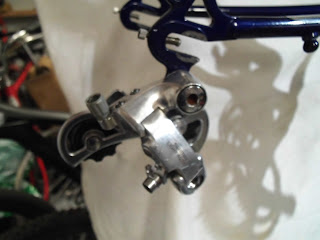
The rear derailleur is a 6 speed Shimano RD-L525. The "L" stands for "Light Action" . It was produced before Shimano came out with their SIS indexed shifting components later in the 80's. It uses a ratcheting system in the shift lever to get to each gear.
I disassembled the rear derailleur and cleaned all the parts.
Rear derailleur (before)
Rear derailleur (cleaned and polished)
After polishing, I oiled all the pivot points and the jockey wheels on the rear derailleur.
Front and rear derailleurs (installed)
Brakes
The brakes calipers are Shimano BR-Z57 . These are side pull brakes made for 700c wheels. They have a quick release lever on the side to loosen the brake tension for removing the wheels.
I disassembled the brake calipers ,cleaned and polished them with Mothers aluminum polish. Then I put some light oil on the pivot points.
Front and rear brake calipers (before)
Front Brake caliper (before)
Front brake caliper (cleaned and polished)
Front brake caliper (complete)
Rear brake caliper (before)
Rear brake caliper (cleaned and polished)
Rear brake caliper (complete)
Front brake caliper (installed)
Rear brake caliper (installed)
Shifters
Shifters (before)
The Lotus came with Shimano S424 12 speed down tube shifters. The left shifter is a friction type shifter , where there is no ratcheting or clicking into gear. you simply move the shifter up or down to change gears. The right shifter is a 6 speed first generation SIS " Shimano Indexed Shifting" shifter . It used a micro ratcheting technique to shift to the next gear. I cleaned and polished these shift levers with Mothers aluminum polish.
Shifters (cleaned and polished)
Shifters (installed)
Stem and Handle Bars
The stem is engraved with the WIN logo. it is 80mm in length. I believe these size stems were standard on most 70,s and 80,s road bikes.
The stem was dirty and greasy . I cleaned it up .Then went through the grits on the polishing wheel.
Stem and hardware.
Stem and hardware (cleaned and polished)
WIN stem (complete)
The bars are Lotus engraved drop bars.
I cleaned up the aluminum , then polished them with Mothers aluminum polish.
Lotus drop bars (complete)
Lotus drop bars and stem (installed)
I put a light coat of grease on the stem so it is easy to adjust and easier to remove for replacement or cleaning.
Brake Levers
These levers are Shimano BL-Z325 Non-Aero brake levers. Non-Aero brake levers have the cables coming out of the top of the lever. Aero brake levers have the cables running inside the bar tape for a cleaner look.
Brake levers (before)
The hoods were dirty so I tried to clean them with "Bleache White" white wall tire cleaner. It works well on white wall bicycle tires ,but did not get the hoods clean enough.
Hoods taken off to be cleaned.
One of the brake levers was bent . I took it apart to bend the lever back into shape.
I cleaned and polished the levers with Mothers aluminum polish. The bent lever had some scratches next to the Shimano logo. I could not wet sand it for fear of damaging the logo, so I just polished it with some steel wool and polish. I oiled the pivot points on both levers so both they pull smoothly.
Brake levers (cleaned and polished)
New Non-Aero hoods
Shimano Non-Aero brake levers (complete)
Shimano Non-Aero brake levers (installed)
Seat post
This seat post is a Sugino micro adjust. It was dirty and greasy. I put it through the polishing grits on the polishing wheel to bring it to a satin shine.
Sugino seat post (cleaned and polished)
I put a light coat of grease on the seat post before installing it in the seat tube. This prevents the aluminum seat post from welding itself to the seat tube over time.
Wheels
1987 was the first year Lotus used a 700c wheel set. In the past years Lotus road bikes were equipped with a 27 1/4" wheel set. Lotus used Araya 700c rims laced to Sansin hubs. The rear wheel is the original Araya rim that goes to this bike . The front wheel was a replacement Alex AT400 rim that did not match.
A couple of years before I found this bike I went to a Thrift shop in Dunedin, Florida , after another bicycle swap meet. I looked around in the shop and found a vintage 700c rim. I bought it thinking I was going to use it on a bicycle one day. Well ,this wheel is an Alesa 700c wheel laced up to a Joytech hub and it matches almost perfectly . So I am going to use it for this Lotus Excelle restoration.
Rear wheel (Araya rim)
Front wheel (Alesa rim)
I trued up the rear rim and removed the 6 speed freewheel. Then I removed the axle , bearings and hardware.
Rear hub and hardware
Araya rim (before)
Rear axle , bearings and hardware.
Rear bearing race (before)
I cleaned the axle and hardware , and replaced the bearings. Next I cleaned and polished the rear Sansin hub.
Rear Sansin hub (cleaned and polished)
Bearing races (cleaned and polished)
The rear rim cleaned up nicely , but it did not polish out as well as I thought it would.
I packed the rear hub with the new bearings with marine grease.
Rear hub overhaul (complete)
The 6 speed free wheel is a Shimano 11 x 28 tooth . It was greasy and dirty with road grime. I cleaned it up in the solvent bin and flushed the inside bearings with lubricant.
After I cleaned the free wheel , I checked the teeth for damage or wear. This free wheel looks brand new so I think it was recently replaced and not too many miles on it.
6 speed Shimano free wheel (installed)
The front wheel is an Alesa rim laced to a Joytech hub.
Joytech front hub (before)
Alesa front rim (before)
The front hub had a coating of dirt and grease on it. The aluminum Alesa rim looked dull. I cleaned the front hub and polished it with Turtle wax chrome cleaner. The rim I cleaned with a scotch brite pad and cleaner. I trued the rim then removed the axle ,bearings and hardware.
Front axle ,bearings and hardware.
Bearing races (before)
Joytech hub (cleaned and polished)
Alesa rim (cleaned and polished)
Bearing races (cleaned)
I packed the front hub with new bearings and marine grease.
Front wheel (complete)
After completing the wheels, I wrapped them in Continental Ultra Sport 700x23c tires.
Skewers
Skewers (before)
I cleaned and polished the quick release skewers with Turtle wax chrome cleaner. I oiled the quick release mechanism and put a light coat of grease on the skewer.
Skewers (cleaned and polished)
I installed new brake cables and housing.
Brake cables and housing (installed)
Front brake cable (installed)
Rear brake cable (installed)
Shift Cables
I installed new shifter cables. I pre stretched them before installation so I wouldn't have to readjust the derailleurs later. I pre stretched the cables by puting the end of the cable in a vice and pulling on them with a pair of pliers to untwist them .
Front derailleur cable (installed)
Rear derailleur cable (installed)
After installing the cables , I adjusted the front and rear derailleurs so they would shift properly.
Pedals
This bike did not have pedals when I bought it. I found a pair of HTI A19 road pedals in the shop. These pedals are from the early 80's . I think they will make a good fit for this Lotus Excelle build.
HTI A19 pedals (before)
I took the pedals apart , replaced the bearings and grease . Then I cleaned and polished them with Mothers aluminum polish.
Right pedal and parts (before)
Right pedal and parts (cleaned and polished)
New bearings and grease
Left pedal and parts (cleaned and polished)
New bearings and grease.
HTI A19 pedals (complete)
HTI A19 pedals (installed)
Saddle
I installed a white vintage style road bike saddle . I think it goes well with the white decals. I have decided to go with a white and blue color scheme for this bike.
Bar Tape
I used Fi'zi:k white leather bar tape for that vintage road bike look and feel.
Fi'zi:k bar tape (installed)
The rest of the pictures are of the complete Lotus Excelle restoration. Enjoy !
This Lotus Excelle turned out to be a beautiful bicycle . The white saddle and bar tape nicely accent the white lettering on the electric blue background. The Shimano components work flawlessly. It rides fast and handles great in the turns. It's hard to believe this bicycle was made in 1987. I had a great time restoring and riding this 1987 Lotus Excelle .
Thanks for reading my blog. I hope you found it interesting , entertaining or maybe you learned something . I know I did, I learn something new about every bike I restore . That's why I like doing it. Cheers Tony


No comments:
Post a Comment