Friday, December 17, 2021

1973 Heidemann 10 speed


                                                           1973 Heidemann 10 speed


         A friend of mine and fellow riding partner Bill , gave me a bicycle to restore. It was a bicycle that he rode in high school back in the 70's. He said it was an old used bicycle that he bought from a friend .                He rode it for a long time and then it ended up taking up space in his garage for years. He was going to throw it out, but instead he gave it to me. My plan is to restore it for him and bring back some memories that maybe the bike might have brought him when he was a teenager.  After all, I think most teenage boys or girls were probably given 10 speed bikes for their birthday or during the holidays.        


        I found very little information about Heidemann bicycles on the internet. I only found pictures of cruisers , balloon tire bicycles and city bikes. Some from the 1950's , most of them were from the 1970's. Heidemann-Work is a bicycle company from Hanover Germany and is still in existence today.              This particular 10 speed bicycle was made in West Germany and I think it was distributed by Sears and Roebuck department stores. The only reason I say that is because it has a Sears decal on the seat tube.  It also has a 73 stamped on the headtube lug and seat tube lug so I am guessing the frame was made around 1973.  This bike has a lugged frame and is made from high tensile steel tubing. (gas tubing). It came with standard Shimano derailleurs and a cottered crank. The brakes are made by Altenburger , the wheels do not have any markings on them.


                                           Pictures of the bike before restoration.


                                                           Sears decal on seat tube.


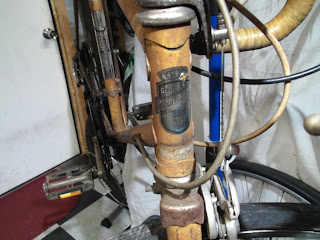
            First step is to take all the components off the bike. Then inspect the frame for rust. I will also see if I can salvage the paint and decals.   The paint on this bike is too far gone. The color is originally yellow but it looks almost light brown from the rust under the paint. The decals look ok but I was not able to salvage them when I removed them from the frame. I am going to instead paint this bike red and try to incorporate the red, yellow and black colors of the German flag.


                                                                     Frame  (before)


                                                                Headtube (before)


                                                                   Top tube (before)


                                                                   Downtube (before)


                                                                   Seat stay (before)


                                                           Seat tube and decal (before)


                                                                  Chain stay (before)


                                                               Rear dropouts (before)

                The rear drop outs are chrome . I am going to attempt to clean and polish them .


                                                                Bottom bracket (before)


                                                                       Fork (before)


                                                              Chrome drop outs (before)


                                                                  PRIMER AND PAINT


           I stripped the old paint off the frame and fork, then I sand blasted all the hard to reach places.  After that I sanded and primed the frame.


                                                             Frame and fork (stripped)


                                                          Frame (sanded and primed)

     I could not find any Heidemann bicycle decals.  So I decided to make my own and paint them on the down tube of the frame. My thought is to make two tone decals using yellow and black paint.


                                                          Yellow base coat for the decals


                                        Basic letter decals to cover the yellow paint underneath.


                                             Black paint to cover the frame around the decals.


           I cut out the outer white trim of the decal paper and applied it around the outside of the decal to cover the black paint. My intention here is to try and make a yellow decal with black trim.


                The frame and forks are going to get two coats of red paint and five coats of clear. 


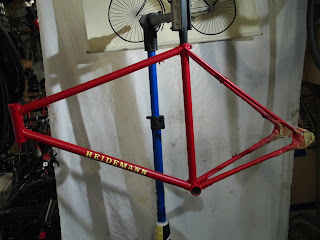
                                                     Red frame with two tone painted decals


                       I found some decals that will go perfectly with the color scheme of the frame.


                                                                Decals for the seat tube.


                                                                     Frame (complete)


                                                            Down tube (two tone decal)


                                                         Seat stay and seat tube (complete)


                                                                Chain stay (complete)


                              I used chrome cleaner and steel wool to clean the chrome dropouts.  


                                                                       Bottom bracket 


           The chrome on the fork was so far gone that it could not be polished. Instead I used a chrome paint to cover up the pitting from the rust.


                                                                      Fork (complete)           


                                                                        HEAD SET

         The headset is chrome. It had some rust on it so I put it in a container of Evaporust for 24 hours.


                                                                      Headset (before)


                                                           Headset and bearings (before)                                                                                   


       Some of the brake system is incorporated into the headset. This piece was rusted and pitted pretty badly. I had to wet sand the chrome and the rust and polish it back to where it would shine again. 


                                                   Headset pieces (cleaned and polished)


                                                                  Headset cups (installed)


                                                                  Crown race (installed)


                                                             Headset bearings (greased)


                                                          Headset and fork (installed)


                                                                        HEADBADGE


          I found this Heidemann head badge on ebay. The bike originally came with a foil decal but I wanted to put a proper head badge to make the bike look more authentic.


                              I am going to paint the head badge the colors of the German flag. 


                                           I painted the head badge using Testors model paint.


                      I drilled holes into the head tube and installed the head badge with metal rivets.


                                                                                STEM


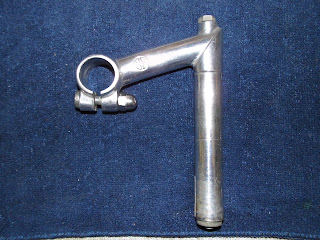
                                                                     Stem (before)

               This stem is a BF Eclair quill stem, made in France. The neck measures 80mm .   I polished the stem using an electric polisher. I went through the grits and then polished it to a nice shine. 


                                                                       Stem and hardware.


                                                               Stem (cleaned and polished)


                                                                   Stem (installed)


                                                                   HANDLE BARS


  The handle bars are Sakae Custom Road Champion . They were badly scratched and had some gouges that I tried to take out by wet sanding. It took some of the gouges out but the deep ones remained.


                                                                  Handle bars (before)


                I wet sanded the handle bars , then polished them with Mothers aluminum polish.


                                                    Sakae handle bars (cleaned and polished)


                                                            Sakae Handle bars (installed)


                                                                        CRANK SET


          The bike originally came with a cottered steel crank set. I took it apart and cleaned it and found that the teeth on the small chain ring were so worn down that I could not reuse them. They were also riveted together so I could not replace just the small chain ring. So I decided to find another crank set from the same era.


                                                                  Old cottered cranks.


         I found an aluminum Tracer crank set. It is a double, almost like the one that came off the bike.


                                                                            Old crank set.
                                                                 

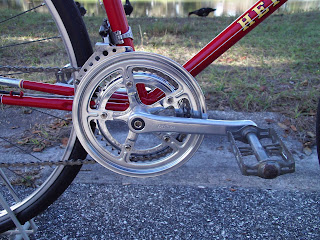
                                                           New Tracer 40/52 tooth crank set.


       I disassembled the Tracer crank and cleaned and polished the chainrings and hardware.


                                                    Tracer crank set (cleaned and polished)


                                                                   Crank set (complete)


                                                               BOTTOM BRACKET


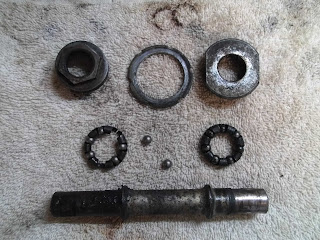
          The original bottom bracket had a round axle with a cup and bearing set up. I found a square tapered bottom bracket that measured 68mm which is the exact length of the bottom bracket shell of the bicycle.


                                                Original bottom bracket. (axle and hardware) 


                                FSA Power Pro 68mm X 115mm square tapered bottom bracket.


                                                            FSA bottom bracket (installed)


                                                               Tracer crank set (installed)


                                                                             BRAKES


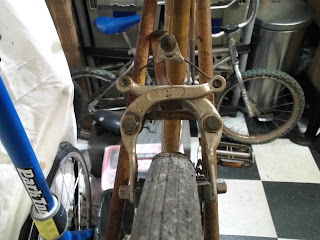
                                                                         Front brake
                                                                                    

                                                                       Rear brake

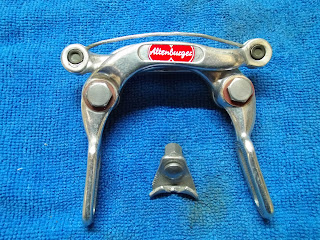
        The brakes are made by Altenburger, a bicycle components company based out of Jestetten ,Germany.  The company was founded by Karl Altenburger in the 1940's.  Karl Altenburger  was a professional cyclist in the 1930's.  His greatest success was a stage win at the Tour de Suisse in 1933 and victory in the Lake Geneva Tour in 1935.
         Altenburger made derailleurs ,rims and brakes. They were famous for their Syncron brake which was the forerunner to Shimano's dual pivot brake.  Altenburger Syncron brakes were similar to that of Wienmann (a famous Swiss company) but without the ability to be finely adjusted. 
         The Altenburger plant was based in a section of Germany that was surrounded by Switzerland on three sides. The two competing companies were only five miles away from each other.  It was said that when Wienmann ran out of brake parts ,they would use Altenburger equivalents to meet demand until they could manufacture more of their own.    The Altenburger plant closed in 1991.


                                                               Front brake (before)


                                                             Front brake parts (before)


                                                    Front brake parts(cleaned and polished)


                                                                 Front brake (complete)

          I could not find the original decals for the brakes. I found some that were slightly smaller.


                                                                    Rear brake (before)


                                                                 Rear brake parts (before)


                                                      Rear brake parts(cleaned and polished)


                                                                    Rear brake (complete)


                                                           Front brake (installed)


                                                                    Rear brake (installed)


                                                                       DERAILLEURS


                                                 Shimano Thunderbird GTO front derailleur


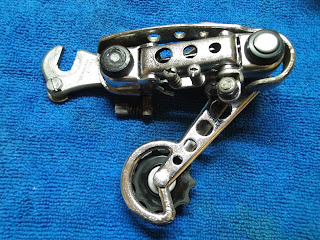
                                                      Shimano Eagle GTO rear derailleur


          The front derailleur is a Shimano Thunderbird GTO. I don't have much information on this derailleur, only that it was a standard front derailleur on many 10 speeds in the 1970's.
           This derailleur was dirty and rusty. I soaked it in Evaporust ,then cleaned and polished it.  After that I oiled all the pivot parts.


       The Evaporust took most of the rust off. There is some pitting on the top of the cage and hanger clamp.   Most of the chrome was able to be polished.


                                   Shimano Thunderbird front derailleur (cleaned and polished)


                                             Shimano Thunderbird front derailleur (installed)


                                                    Shimano Eagle GTO rear derailleur


       The Shimano Eagle rear derailleur is special because it was Shimano's attempt to gain back control of their brand from Schwinn, which at the time was the most powerful bicycle brand on the planet. 
       Shimano made "Schwinn Approved" components for Schwinn . The Eagle rear derailleur met all of Schwinn's requirements but was completely designed and engineered by Shimano. The GTO is the long cage version of the Eagle.


    I disassembled the derailleur , cleaned all the parts and oiled all the pivot points and jockey wheels.


                                                       Rear derailleur (cleaned and polished)


                                                 Shimano Eagle rear derailleur (complete)


                                                    Shimano Eagle rear derailleur (installed)


                                                                      SHIFT LEVERS


  These are Shimano Fingertip stem mount shift levers. They are friction shifters with ratcheting action.


                                              I polished them with Mothers aluminum polish.


                                         Shimano Fingertip shift levers (cleaned and polished)


                                                   Shimano Fingertip shift levers (installed)


                                                                   BRAKE LEVERS


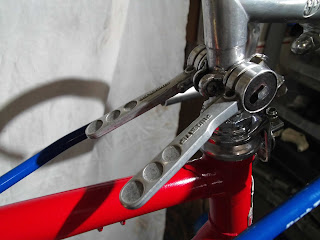
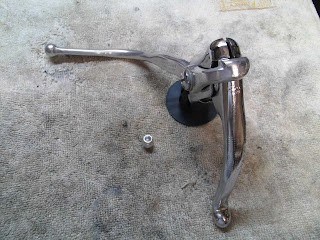
       The brake levers on this bike were not a matching pair.  The right brake lever is an Altenburger ,which I think is original to the bike. The left is a Dia-Compe .  I don't have any spare brake levers to make a matching pair, so I am going to replace both of them with ones of that era.


         The old brake levers have bars attached to them for braking while your hands are on the top of the drop bars.  Some brakes of that era were made like this for convenience . I call them "suicide handles" because they really did not stop the bike when you needed them to. The actual brake levers worked better.


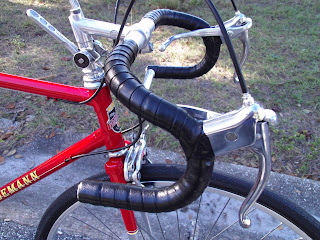
       I found a set of Arai brake levers .They are in good condition and closely match the ones from that era.  This set came with the "suicide handles" to match the original levers.
       I took the levers apart to clean and polish them.  After that I lubed the pivot points.


                                                             Left brake lever (before)


                                                     Left brake lever (cleaned and polished)


                                                       Left Arai brake lever (complete)


                                                          Right brake lever (before)


                                                    Right brake lever (cleaned and polished)


                                                           Arai brake levers (complete)


                                                             Arai brake levers (installed)


                                                                           WHEELS


        The wheels that came with the bike were 27 1/4 " unbranded, with high flange hubs. The rear wheel had a crack in the rim next to a spoke nipple. I am not going to try and repair these wheels but I have a pair of nice replacement wheels that will go nice with this restoration.


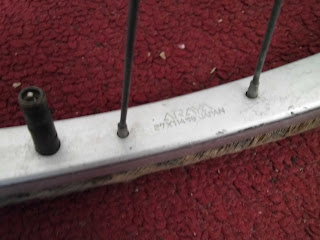
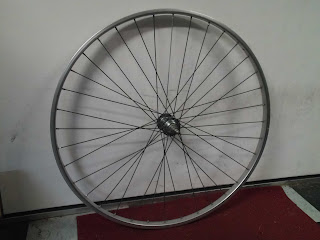
         I had a set of 27 1/4" wheels in my shop. These are aluminum Araya rims ,they are probably from the late 70's early 80's era. My plan is to clean them up and put new tires on them.


                                                                   Front wheel (before)


                                                                   Front Hub (before)


                                                    Bearings ,hardware and axle (before)


                                                          Hub bearing race (before)


                                                         Front rim (cleaned and Polished)

      I cleaned the rims with a scotch brite pad and Mothers aluminum cleaner and polish. I cleaned the hubs with chrome cleaner and steel wool.


                                                        Front hub (cleaned and polished)


                                         Bearings ,axle and hardware (degreased and cleaned)


                                                      Bearing races (cleaned and degreased)


                                                          Front hub (new bearing grease)


                                                              Front hub (complete)

                                 I wrapped the wheels in Bell Streetster 27 1/4" black wall tires.
                                                                            

                                                          Araya 27 1/4" wheel (complete)


                                                             Rear Araya wheel (before)


                                                            Araya aluminum rim (before)


                                                                   Rear hub (before)


                                                 Rear axle ,bearings and hardware (before)


                                                        Rear hub bearing race (before)


                                                     Rear Araya rim (cleaned and polished)
                                                               

                                                         Rear hub (cleaned and polished)


                              Rear axle and hardware (cleaned and degreased) with new bearings.


                                              Rear bearing races (cleaned and degreased)


                                                           New bearings and grease.


                                                      Rear Araya 27 1/4" wheel (complete)

          The original set of wheels came with a chrome spoke protector or "pie plate".  The spoke protector has a "333" embossed on the out side. I found out that Shimano produced a "333" series 5 speed freewheel and spoke protector to go with it. I cleaned the spoke protector with Turtle wax chrome cleaner.


                                                  Shimano "333" spoke protector (before)


                                        Shimano "333" spoke protector (cleaned and polished)


         The old Shimano "333"  5 speed freewheel was used up . It may have been the original one from 1973.


                                            New Shimano "Z" 14-28 tooth 5 speed freewheel.


                    This bike is getting a new 5 speed freewheel and a new 5 speed KMC chain.


                                                        Chain and freewheel (installed)


   The wheels came with acorn style axle nuts. I found a set of alloy wing nuts that will work great for removing the wheels without a wrench.


                                                          Front wheel with wing nuts.


                                                           Rear wheel with wing nuts.


                                                               CABLES AND HOUSING 


           For this build I used Bell replacement cable kit. The kit has brake cables, derailleur cables and housing.  I am going to black cable housing to match the black saddle, bar tape and tires.


                                                          Brake cable and housing (installed)


                                                       Front brake cable and brake pads.   
                                                   

                                                        Rear brake cable and brake pads. 


                                                    Derailleur cable and housing (installed)


                                                                           PEDALS


         These pedals look original to this bike. They are Union U-40 pedals .  Made in Germany.
   I cleaned them with Turtle Wax chrome cleaner and steel wool. I broke the reflectors when I tried to remove them. There is no way to take these pedals apart to re grease the bearings so I ended up just spraying lubricant down in both sides of the axles.


                                                Union U-40 pedals (cleaned and polished)


                                                                         SEAT POST


                   The bike came standard with a chrome seat post. It was rusty ,dirty and tarnished. I soaked it in Evaporust which took off most of the rust. All that was left was some minor pitting. I cleaned and polished it with chrome cleaner.


                                                   Chrome seat post (cleaned and polished)


                                                        I found a nice black leather saddle.


                                    Black leather bar tape to compliment the black leather saddle.


                                                               Heidemann 10 speed 


          This Heidemann 10 speed has been an interesting build. From the well made West German frame to the Shimano Eagle rear derailleur , and the Altenburger brakes.  Each component had an interesting story to tell and I enjoyed learning about their history as well.                                                                                It was a rather time consuming restoration because there was paint work involved, but I think it turned out looking pretty nice.  My vision to incorporate the colors of the German flag worked ok ,but it just looks like a red bike with yellow and black decals . I guess if you think about it , those are the colors of the German flag. So I think it worked out after all. 
            I took the bike for a spin around the block. The ratchet style friction shifters took some time to get used to.  The clicking of the shifter resembles indexed shifting ,but you still have to fine tune your gear selection. The brakes don't stop the bike as fast as I would like , but it is 1970's technology . 
            I remember riding bikes like these in the late 70's and early 80's when I was a kid. It brought back memories of being a small of a  kid on my brothers 10 speed that was way too big for me. The feeling of freedom was fantastic.    I hope you enjoyed this build as much as I did.  
                   Thanks for taking the time to read my bicycle blog.    Cheers  ,Tony .


                                        The rest of the pictures are of the complete bicycle.


                                                                   See you next time .


1 comment: