Wednesday, September 28, 2016

Hannah's Fat Tire Bicycle

          In October 2014 my friend Troy asked me to build a bicycle for his daughter Hannah. She wanted something different from what the department stores were selling at the time.  The bicycle was going to be a Christmas present for her which gave me a deadline of 2 months to get the bike done. My plan was to find a frame and build it up with parts off of ebay or special parts that I might have in my shop. Once I find the parts I would let Troy or his wife Beth know. They would intern let me know if it was something Hannah would like on the bike, which includes the type of seat, the design on the seat, color of grips etc.

         I found some frames on ebay but while bidding on the frames, the prices ended up going way to high. So I tried Craigslist and found a complete bike for a great price. It was a beach cruiser type bike with a coaster brake, some rust and lots of spray paint hiding the decals and covering the tires and handlebars.


      Most parts on the bike were not usable. The wheels were rusted and painted with silver spray paint. One wheel was wider than the other.  The handle bars were spray painted gray and the seat was just unacceptable. Items on my parts list include : New wheels, seat and handlebars. 

      The bike was easy to take apart. I sprayed all nuts and bolts with PB Blaster before taking the bike apart. I cleaned and polished the cranks and stem. The bike also received  new tires and a new chain.


                      Handle bar and stem came off nicely. also seat seat post and cranks came off.


                                                      The forks and wheels came off next


                         I started stripping the white spray paint and pink paint was under that coat.


Forks ,stripped of white spray paint.


          I used a strong paint stripper to get the frame down to bare metal, after that I sand blasted the hard to reach places and all the welds.

Forks stripped to bare metal. 


I stripped the chain guard .The pieces I did not want painted, I wrapped with painters tape.


I used automotive primer on all parts to be painted. I then wet sanded the primer to get rid of any lumps.


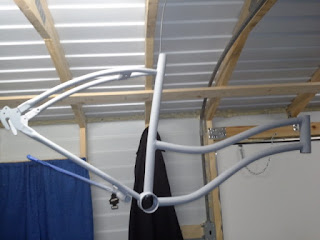
Frame and forks primed and ready for paint.


Headset parts and seat post clamp primed and ready for paint.


While I was waiting for the primer to dry, I cleaned and polished the cranks and stem. The bolts for the stem are getting painted with a chrome spray paint.


Beth picked Burnt Orange for the color coat. I use Dupli - Color paint because it is already thinned down to work in my spray gun. It also comes in just about any color imaginable.  The bike received three coats of color and three to four coats of clear lacquer.


Three to four coats of clear lacquer.


All the bicycle parts getting first color coat.


After the final color coat, I let the frame and other parts dry for 24 hours before applying the clear coat.


Frame clear coated and ready for assembly.


I greased the bottom bracket bearings and installed the cranks. Next I Installed the headset cups, greased the bearings and installed the forks. When installing and tightening the hardware for both the cranks and the headset , make sure they don't feel grainy when you turn the cranks or the forks. If they feel grainy, loosen about half of a turn and tighten a little bit to reduce the play in the bearings.


The bike also received some nice shiny chrome handle bars. 

      In addition to the handle bars, I also installed : Chrome fenders, Black leather seat and grips with white stitching, new pedals and white wall tires. I did not include separate pictures of these items because I restored this bike a couple of years before I started this blog and I did not see the need to take pictures of the items as part of the build.     The next set of pictures are of the bicycle completed and ready to ride.


In the shop.


Nice head badge to accent the bike.


          This bike was a pleasure to build. It did not originally come with fenders but these fenders fit nicely. I test rode the bike and it handled nicely. It was fun to ride a cool cruiser like this one. I recently talked to Troy and he said that Hannah loves riding the bike and always gets compliments while riding on the paved trails in town.     I hope you enjoyed reading my complete restoration of this bicycle. Check back soon for more restorations.  Tony.

Monday, September 5, 2016

Dinky's 1960's AMF Roadmaster Skyrider

        A couple of years ago my friend Dan brought me a bicycle he found in a trash pile. He asked if it was worth restoring. I think any old bicycle is worth restoring just for the fact that an old bicycle is different, it can be a conversation piece or just plain fun to ride. This particular bike looked really old and it was in rough shape.                                                          


        I took this picture after I started taking the bike apart. I took the rear tire , chain, and chain guard off the bike.  The bike did not have a seat, seat post or seat post clamp. The rear fender was smashed into the rear wheel, bending both out of shape. The rear wheel has a flat spot and won't roll straight. I will replace them with a new set of chrome wheels. The chain was totally rusted together. The chrome on the handle bars is rusted and badly pitted, they have a cool design, almost like ape hangers. 


                                  Handle bars, nice riding position. No head badge on front of bike.                               


                                                                  Smashed rear fender


    This bike had a couple of coats of paint plus a coat of blue spray paint concealing any clue to the maker or model of this bike. I started looking at the brands of parts used on this bike to try to determine what company made this bike. The only name on the whole bike was on the coaster brake on the rear wheel. It says KOMET SUPER.  I researched what bicycle companies used Komet coaster brakes in the 50's and 60's . Several bicycle companies used Komet coaster brakes, it seamed like Komet Coaster brakes were common equipment used at that time. JC Higgins Colorflow looked like the best match . The frame geometry was a match, the fenders and the shape of the rear triangle of the frame all looked the same as a JC Higgins Colorflow.  JC Higgins was a bicycle brand carried by Sears in the 50's and 60's.  I located a head badge on Ebay.                                                      


                                                                   Rear coaster brake arm                  


Rear coaster brake


Nice head badge

                                                                                                                                                                          Well the head badge did not fit. The holes on the head badge did not line up with the holes on the head tube. The head badge was a half inch too small on top and bottom.  I probably bought a smaller head badge. I will look for a larger one later.         Next thing to do is strip the frame of old paint.  I used a heavy duty paint stripper for the large parts and I sand blasted the welds and hard to reach spots. . The frame had three coats of paint plus a coat of blue spray paint. The original paint was a sparkle blue.                                        
      The front fender had some dents and the rear fender was creased close to the bottom. I stripped the fenders , banged out most of the dents and used Bondo to smooth out the rest of the dents in the fenders. Next I stripped the chain guard. while I was rubbing the paint stripper on to the chain guard I exposed some letters under the spray paint. The letters spelled "Skyrider".   I Google searched Skyrider and the AMF Roadmaster company came up. Now I know who makes the bike and I will look for the correct head badge.                       


                                              Fenders and chain guard getting stripped


                                                                       SKYRIDER                                                                                     

        Roadmaster was founded in 1936 by the Cleveland Welding Company and was purchased by AMF . American Machine and Foundry company in the 1950's. From looking at pictures of Skyriders , this bike looks to be from the 1960's. 

         I used Crown  "Tuff Strip" paint stripper to remove the paint from the frame and other painted parts. I brushed it on with a paint brush and it came off with a paint scraper. I cut a round notch out of a plastic scraper to scrape the round tubes of the frame.  


       The chrome on the handle bars could not be salvaged so I sanded it down starting with 50 grit sand paper and ending with 600 grit sand paper to remove all the pitted chrome. Then I primed and painted the handle bars.                                                       
                                                                                      

                                                 Handle bars sanded and ready for primer


                                                Fenders primed and sanded. Ready for paint


                                          Frame and Forks primed ,sanded and ready for paint                                                    

       This bike was going to be for Dan's wife ,Dinky. The wanted satin black paint , leopard print grips and seat. She also wanted an orange chain and white wall tires. The paint won't be the original sparkle blue but the satin black will make it look like a rat rod bicycle. 


                                                       Applying 3 coats of satin black paint    


                                     Painted bike, with seat post and clamp also polished stem


                                                        "AMF" Roadmaster head badge


         I used bronze wool and a light oil to clean the chrome cranks and handle bar stem. Bronze wool will not scratch chrome like fine steel wool will. Then I polished all the chrome parts with Diamond Chrome polish.


     Cranks polished and installed. I also greased the crank bearings. The head set bearings have new grease too.  I bought a new pair of chrome rims and white wall tires for the bike.


Almost complete .


           View of cranks and red chain. The chain guard came out good. I painted "Skyrider" freehand using Boxer font. Maserati uses boxer font for their chrome emblems on their automobiles. Below is a sample I used to assist in drawing the skyrider logo.


                                               These next pictures are of the complete bike.     
                                                                                    

                                                Complete with  leopard print seat and grips                                           


                                                       Chrome and black satin paint shine.                            


        This bike took me a while to finish. I had a make and model dilemma, the headset bolt would not budge. I sprayed PB Blaster on the threads five days a week for a month and still no luck. So I was unable to remove the forks when I stripped the bike. I was able to spray lithium grease, and lots of it on the head set bearings. Everything turns smoothly and the bike rolls fast and corners nicely.

         I enjoyed restoring this bike. The older bikes are a challenge because the era correct parts may not always be available .But you can always give an old bike an new look. The paint and components Dinky picked out gives this bike a rat rod look and feel.      Thanks for looking at my blog. Hope to see you soon , Tony .